Fotor logo
Fotor Editorial Team
7 min read

How to Create a Brand Kit: A Step-by-Step Guide

Creating a brand kit can quickly become messy when logos, colors, fonts, images, and brand details are scattered across different files and platforms. The challenge is not just collecting these assets, but organizing them into a clear system that anyone on your team can actually use.

This guide walks you through the process of creating a practical brand kit from start to finish, including what to include, how to review your brand assets, and how to turn them into a usable system with Fotor. You can start from an existing webpage or add everything manually, then refine the details and test the finished kit on a real design.

Create for Free
Fotor how to create a brand kit banner image

A brand kit keeps the core elements of your brand in one place, so you do not have to look through old files or ask your team which logo, color, or font to use every time you create something. You do not need a long brand manual to get started. A useful brand kit should simply give you and your team enough information to create on-brand content without guessing. The real test is simple: could a designer, freelancer, or teammate use your brand kit to create a basic piece of content without having to ask you what to use?

This guide shows what to include, how to put it together, and how to create one in Fotor.

what a brand kit looks like

What Should a Brand Kit Include?

The exact contents vary from brand to brand, but a practical brand kit usually covers the core elements people need to create consistent marketing materials:

  • Logo and brand assets — your approved logo variations and any essential visual assets used across your marketing materials.
  • Colors — your primary and supporting colors, along with their HEX values for easy reference.
  • Typography — the fonts you use for headlines, body copy, and other text elements.
  • Imagery — examples of the photography, illustration, or visual style that fits your brand.
  • Brand messaging — key information such as your tagline, brand description, values, or tone of voice.
  • Usage rules — simple guidelines for common situations, such as which logo or color to use on different backgrounds.

You do not need to document every detail. Include the information people actually need to create on-brand content without guessing.

How to Create a Brand Kit

Fotor is an online creative platform for making and editing visual content. Its AI Brand Kit helps you organize the key assets and information behind your brand in one place, so you can spend less time collecting files and re-entering brand details when creating marketing content.

You can either start with an existing webpage and let Fotor pull in relevant brand elements, or add your brand information and assets manually. In both cases, you can review and adjust the results before generating your Brand Kit.

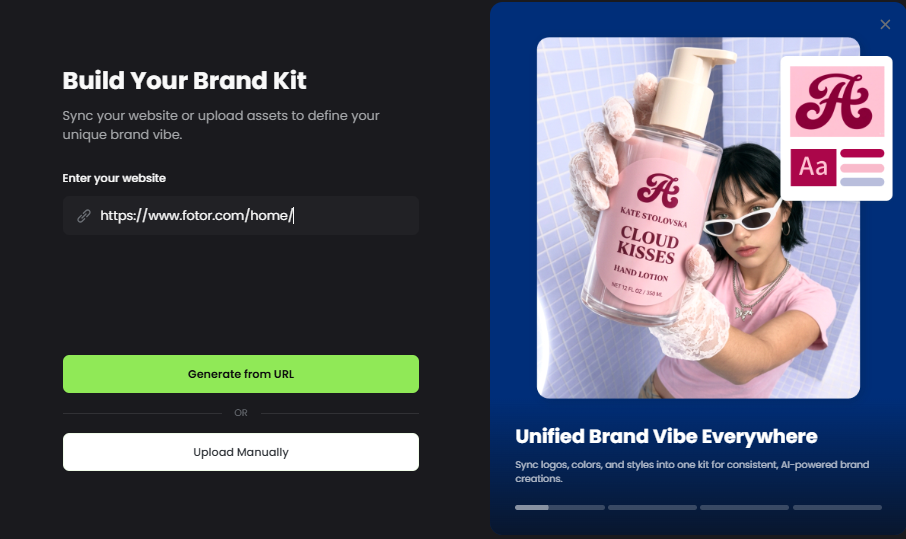
Step 1: Import Your Website or Start Manually

If your website already reflects your current branding, you can use it as a starting point.

Upload a webpage, and Fotor can extract key brand information and assets from it, including your brand name, logos, colors, fonts, identity information, and images.

This gives you a starting version of the kit instead of making you enter every item yourself.

A homepage often works well because it contains many of the elements that define a brand. But it is worth choosing a page that represents your current branding. If your site has an old logo, seasonal campaign graphics, or several different visual styles, some of the imported elements may not belong in the final kit.

You can also skip the webpage import and add your information manually.

This can make more sense when you have recently rebranded or already have a clear set of approved assets.

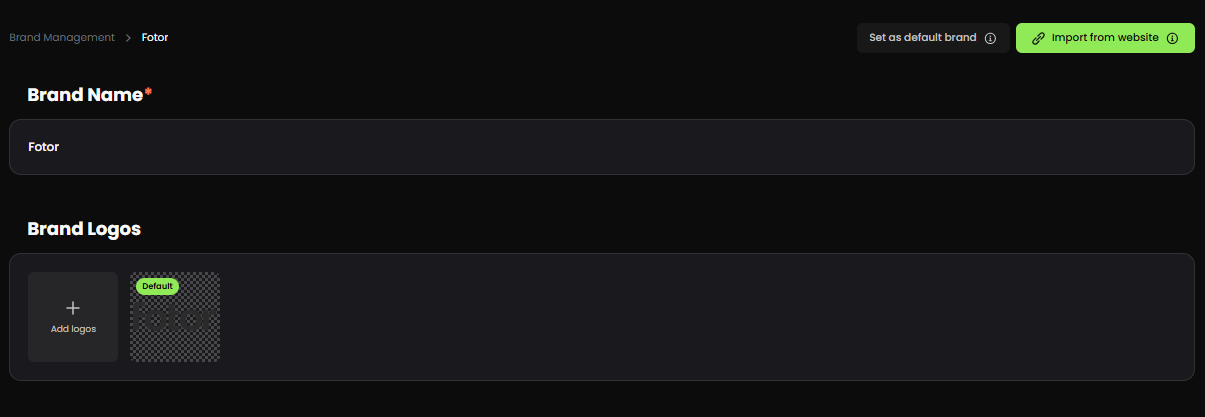
Step 2: Check Your Brand Name and Logos

Start by checking your Brand Name.

Make sure the spelling, capitalization, punctuation, and spacing are correct. Use the version you want to carry into future marketing content.

Then review your logos.

Keep the versions that have a clear purpose, such as:

  • Primary logo
  • Secondary or stacked logo
  • Logo mark or icon
  • Light or reversed version

Remove outdated files and unnecessary duplicates.

If you are still working on your first logo, you can use Fotor's AI logo generator to explore different logo directions before adding the final version to your brand kit.

step 2 check your brand name and logos

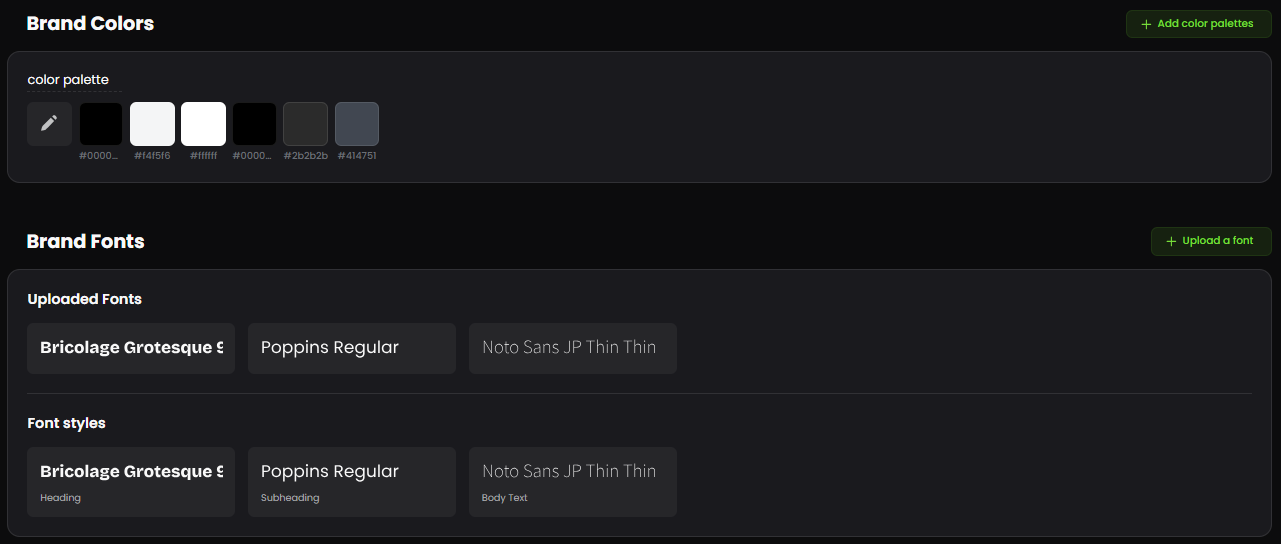
Step 3: Review Your Colors and Fonts

Next, check the colors pulled from your webpage or added manually.

A webpage may contain many colors that are not part of the core brand palette. A button, promotional banner, illustration, or seasonal campaign can introduce a color that should not be reused across every design.

Keep the colors you actually want to carry forward and give them a basic role.

For example:

Color
HEX
Use
Forest Green
#244A3C
Main brand color
Cream
#F5EFE2
Backgrounds
Warm Brown
#8A5A44
Supporting elements
Orange
#D97A45
Highlights

You can also add RGB values when they are useful for screen-based work. Then check your fonts. A simple brand may only need one typeface for headings and another for body copy. The exact combination is up to the brand; what matters is that the roles are clear.

Example:

Headings: DM Sans Bold
Body: Inter Regular

Avoid keeping every font that happens to appear on your website. A campaign font or a one-off promotional typeface does not automatically belong in your core brand system.

Step 4: Fill in Your Brand Identity

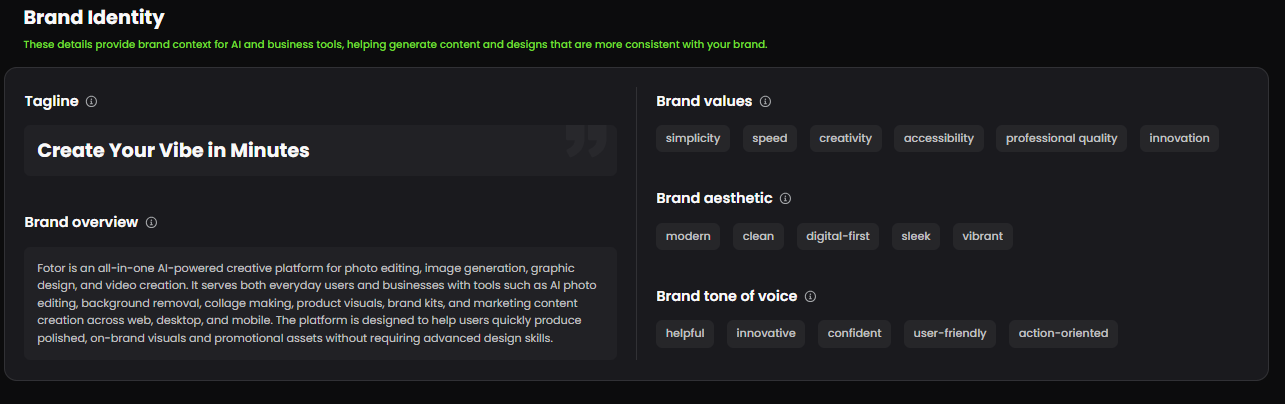
Your visual assets explain what the brand looks like. Your brand identity adds context for how the brand should be represented in content. In Fotor, the Brand Identity section includes five areas.

Tagline

Add a short phrase that represents your brand and can be reused in marketing.

Example: Better coffee, less waiting.

A tagline may be used in ad headlines, social media post generation, website hero copy, or campaign themes, so keep it short enough to work in different contexts.

Brand Overview

Describe what your business does, what it offers, and who it serves.

Example: A neighborhood coffee shop serving specialty coffee and simple breakfast options for busy professionals and local residents.

Keep this practical. Someone reading it should understand the business quickly.

Brand Values

Add the principles you want your communication to reflect.

Example: Quality · Friendly service · Local connection · Simplicity

Choose values that actually influence the way the business operates or communicates. A short list of specific ideas is more useful than a long collection of generic words.

Brand Aesthetic

Describe the visual direction you want to maintain across images, videos, advertisements, product visuals, and layouts.

Example: Warm natural lighting, earthy colors, clean compositions, subtle textures, and a relaxed neighborhood feel.

Be concrete. Details about lighting, color, composition, setting, or photography style give much clearer guidance than simply saying “modern and professional.”

Brand Tone of Voice

Describe how your brand should sound in copy, emails, social posts, customer support, and sales content.

Example: Friendly, concise, conversational, and confident. Avoid corporate jargon and exaggerated claims.

You can also add a short example of language you would use or avoid.

step 4 fill in your brand identity


Step 5: Review Your Brand Images

Now check the images included in your kit. Look at them together rather than one at a time. You want to make sure they point in roughly the same visual direction. For example, if most of your images use natural daylight and warm neutral backgrounds but a few are dark, heavily filtered, or highly stylized, decide whether those outliers really belong.

Remove images that are:

  • Outdated
  • Specific to a one-time campaign
  • Visually inconsistent
  • Unrelated to your current products or audience

You are not trying to build a complete archive. A smaller group of useful reference images is often easier to work from. Need more visuals that match the direction you have defined? Fotor's AI photoshoot generator can create product and lifestyle images from your existing product photos.

Step 6: Review the Whole Brand Kit

Before generating the final kit, review all the sections together. This is where you catch problems that may not be obvious when each part is viewed separately. For example, your Brand Aesthetic might call for warm, natural visuals while the selected images are dark and heavily edited. Your Tone of Voice might say “friendly and conversational” while your tagline sounds formal.

Run through the basics:

Brand Name — Is it current and written correctly?

Logos — Are only approved versions included?

Colors — Are these the colors you actually want to reuse?

Fonts — Are the main typefaces and their roles clear?

Images — Do they show the visual direction you want?

Brand Identity — Does it accurately describe the business and how you want it represented?

If you started by importing a webpage, this is the stage where you should make the most edits. The import gives you a starting point; it does not decide what belongs in your final brand system.

Step 7: Generate Your Brand Kit

Once everything looks right, click Generate. Your selected brand assets and information are brought together into the Brand Kit. At this point, check whether the result is actually easier to use than the files you started with. You should be able to find the right logo, color, font, image, or brand information without going back through old projects. If you still have to search for basic assets, the kit needs more organization.

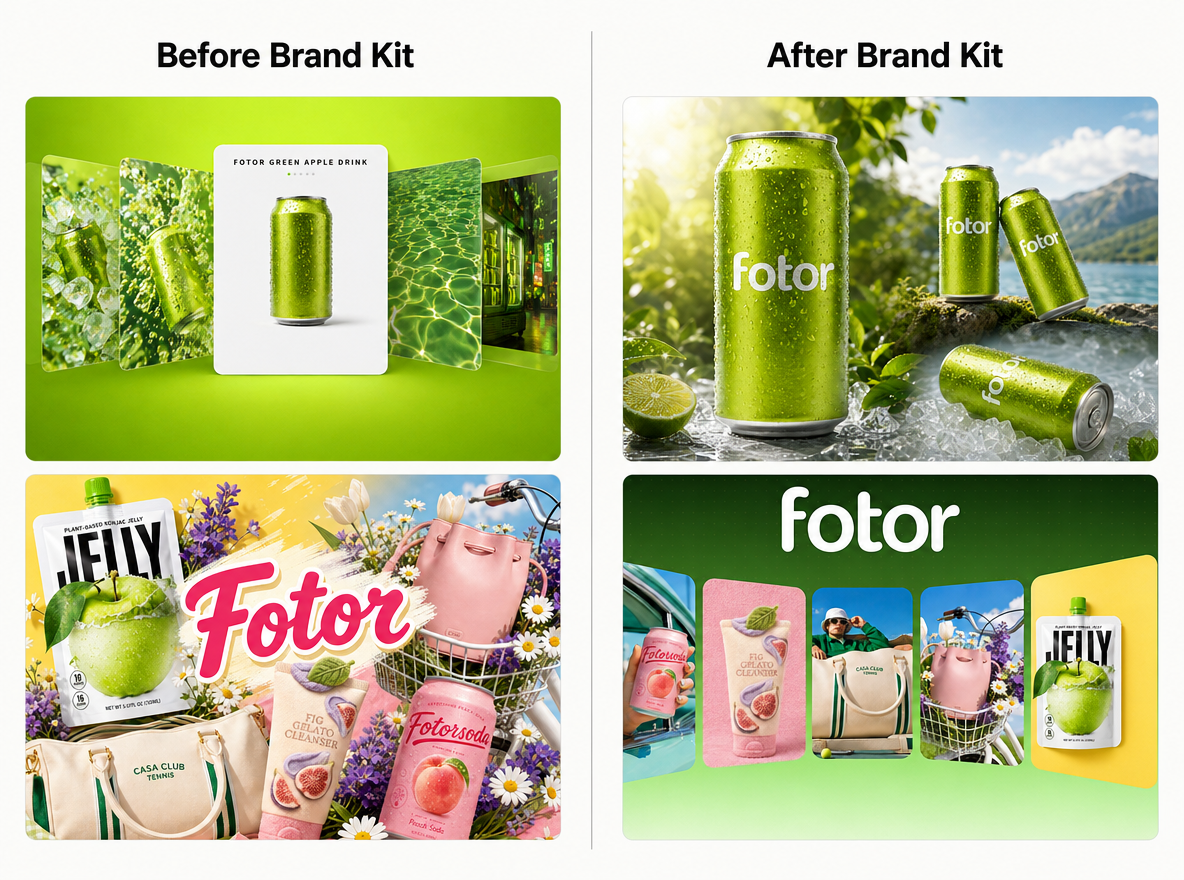
Step 8: Test the Kit on a Real Design

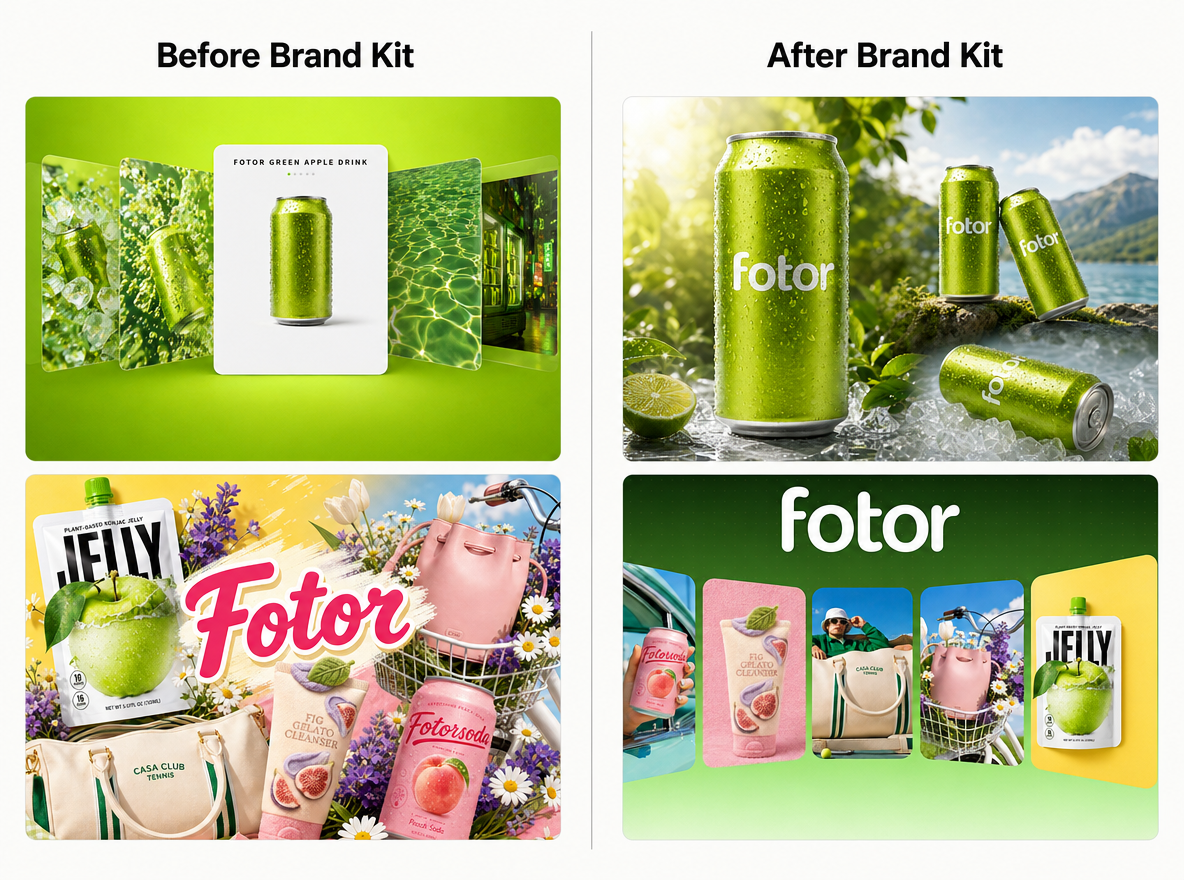
A generated kit is not necessarily a finished one. Use it on a real piece of content, such as a social post, advertisement, product visual, presentation slide, or promotional graphic. Then compare the result with the brand materials you already use.

test the kit on a real design before and after comparsion

If one part consistently feels wrong, change the relevant brand information rather than fixing every future design separately. For example, if the generated visuals keep using dark photography but you want bright, natural images, make the Brand Aesthetic more specific and update the image references. This test tells you whether the kit works in practice, not just whether every field has been filled.

A Complete Brand Kit Example

You can keep a small-business brand kit quite compact. Here is an example for a fictional coffee shop.

Brand Element
Example
Brand Name
Northline Coffee
Tagline
Better coffee, less waiting.
Brand Overview
A neighborhood coffee shop serving specialty coffee and simple breakfast options for busy professionals and local residents.
Brand Values
Quality · Friendly service · Local connection · Simplicity
Brand Aesthetic
Warm natural lighting, earthy colors, clean compositions, subtle textures, relaxed neighborhood feel
Brand Identity
Friendly, concise, conversational, confident

Logo

  • Primary horizontal logo
  • Stacked logo
  • “N” icon
  • White version for dark backgrounds

Colors

Role
HEX
Primary
#244A3C
Secondary
#F5EFE2
Supporting
#8A5A44
Accent
#D97A45

Fonts

  • Headings: DM Sans Bold
  • Body: Inter Regular

Image Direction

Use natural daylight, warm neutral backgrounds, close-up coffee and food photography, and casual neighborhood settings.

Avoid heavy filters, neon colors, cluttered backgrounds, and overly staged stock imagery.

This is enough to give a designer a clear starting point without turning a small business into a full brand manual.

How to Store and Share Your Brand Kit

Once the kit is ready, make sure the people who need it can access it easily.

A PDF and shared asset folder can work well when you send the kit to freelancers, agencies, or outside designers.

A shared workspace such as Google Drive or Notion can be useful for a small team that needs to update the information over time.

If most of your marketing work happens inside a design platform, keeping the brand assets there can make them easier to reuse.

For brands creating marketing visuals in Fotor, the Brand Kit keeps your core brand information and assets together so you can reuse the same foundation in future projects.

FAQs

1. What should a brand kit include?

A practical brand kit can include your approved logos, colors, fonts, imagery, and key brand information such as your tagline, business description, values, visual direction, and tone of voice.

2. How many colors and fonts should I use?

There is no fixed number. Around three to five core colors and two main font families are a practical starting point for many small brands. Add more when there is a clear reason to use them.

3. Can I create a brand kit for free?

Yes. You can create a basic brand kit with a document and a shared folder. A design platform can make asset management more convenient, but you do not need one simply to define your brand assets and basic rules.

4. Does a small business really need a brand kit?

A simple one can be useful even for a very small business, especially when more than one person creates marketing content. You do not need a large brand system. A short, clear reference can be enough.

Build a Brand Kit That Saves Decisions

Your brand kit does not need to document every detail of your business. It needs to capture the decisions people make repeatedly when creating branded content. Keep the approved assets together, remove outdated material, and write down enough visual and messaging direction that someone else can work without guessing. Then test the kit on a real design. If it produces something that looks and sounds like your brand without a long explanation, you have a brand kit that is ready to use.