
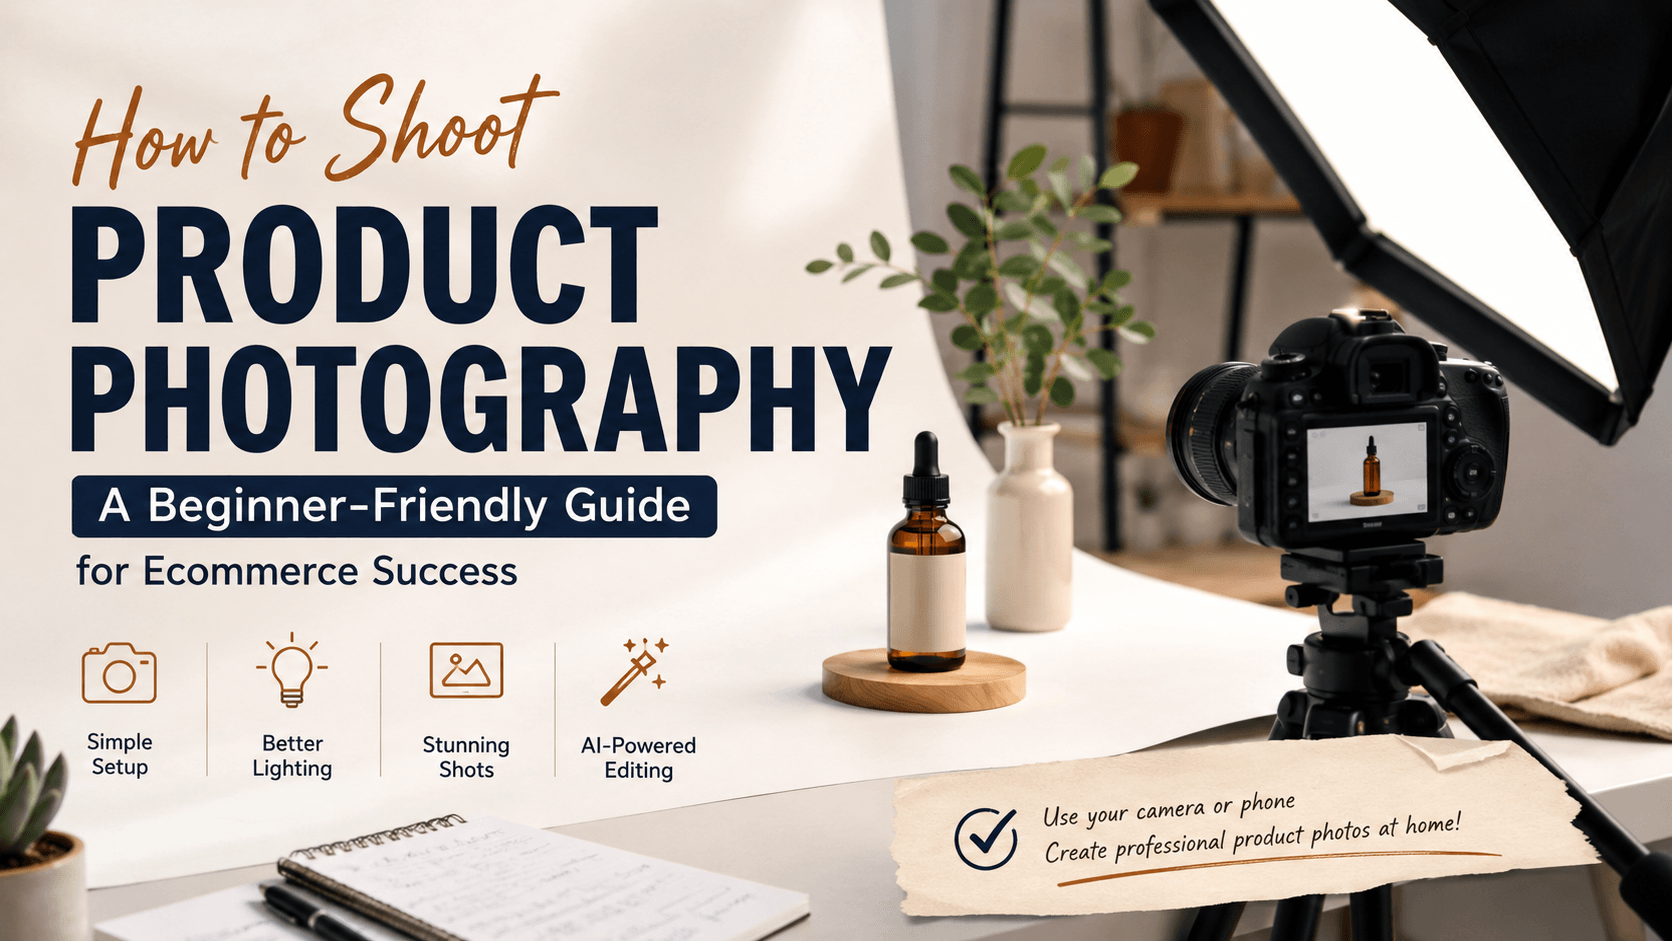
Are you struggling with time-consuming and costly product photography? High-quality product images are essential for attracting customers and driving conversions, but hiring professional photographers, editors, models, and renting a studio can quickly become expensive.
The good news is that creating professional-looking product photos no longer requires a huge budget. In this guide, you’ll learn how to shoot e-commerce product photography using a camera or smartphone, set up a simple DIY studio, and enhance your images with AI e-commerce photo editor, so you can achieve professional results at home without breaking the bank.
TL;DR:
💡Great product photography doesn’t always require expensive equipment or a professional studio. With good lighting, clean backgrounds, and consistent editing, even beginners can create polished, high-quality e-commerce product photos.
💡Using a camera or a smartphone and AI product photo editing tools, you can shoot, edit, and enhance product images at minimal cost while boosting sales and brand appeal.
Now, let's dive into what product photography is and explore how to shoot product photography.
📷What Is Product Photography?
💡Definition of Product Photography
Product photography is a type of commercial photography that showcases products in a professional and visually appealing way. Its purpose is not only to highlight a product's features, details, and quality, but also to build brand identity and attract potential customers.
High-quality product photos help consumers better understand what they are buying before making a purchase. Clear, attractive, and consistent product images can capture attention, improve trust, and encourage customers to take action, making product photography an essential part of e-commerce marketing.
💡Common Types of Product Photography
There are different types of product photography, and each serves a different purpose in ecommerce and marketing. Here are some of the most common product photo styles:
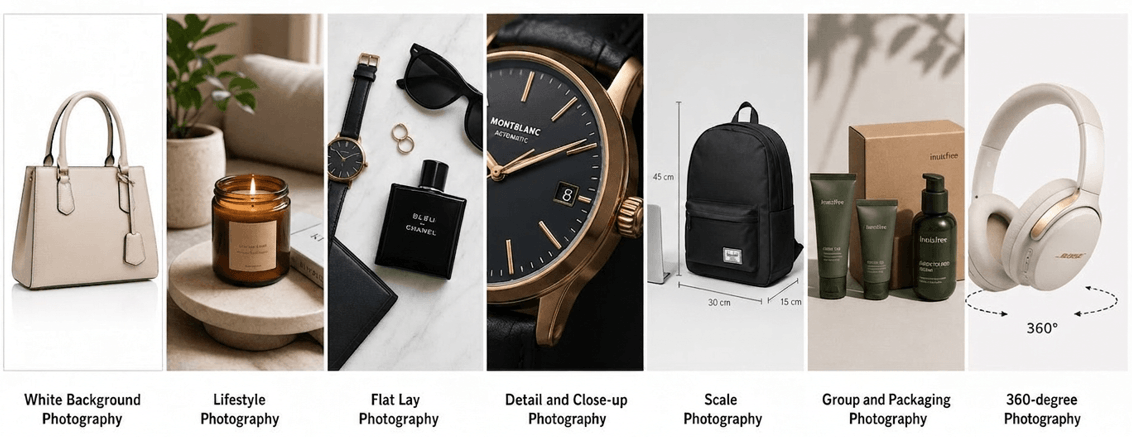
- White Background Photography: Classic and clean, keeping the focus entirely on the product.
- Lifestyle Photography: Shows your product in real-life contexts, often with models, helping customers imagine its use.
- Flat Lay Photography: Overhead shots of styled products, perfect for fashion, beauty, food, and social media content.
- Detail and Close-Up Photography: Highlights textures, materials, and craftsmanship, showing quality up close.
- Scale Photography: Shows the product's size relative to familiar objects, helping customers gauge dimensions.
- Group and Packaging Photography: Displays product variations or packaging, ideal for bundles and collections.
- 360-Degree Photography: Provides a complete, interactive view of the product from every angle.
In e-commerce, your product images are often the first impression of your brand. Strong product photography can make the difference between a sale and a bounce.
Before shooting your product photos, it's important to prepare the right equipment. Some are must-haves, while others are optional enhancements:
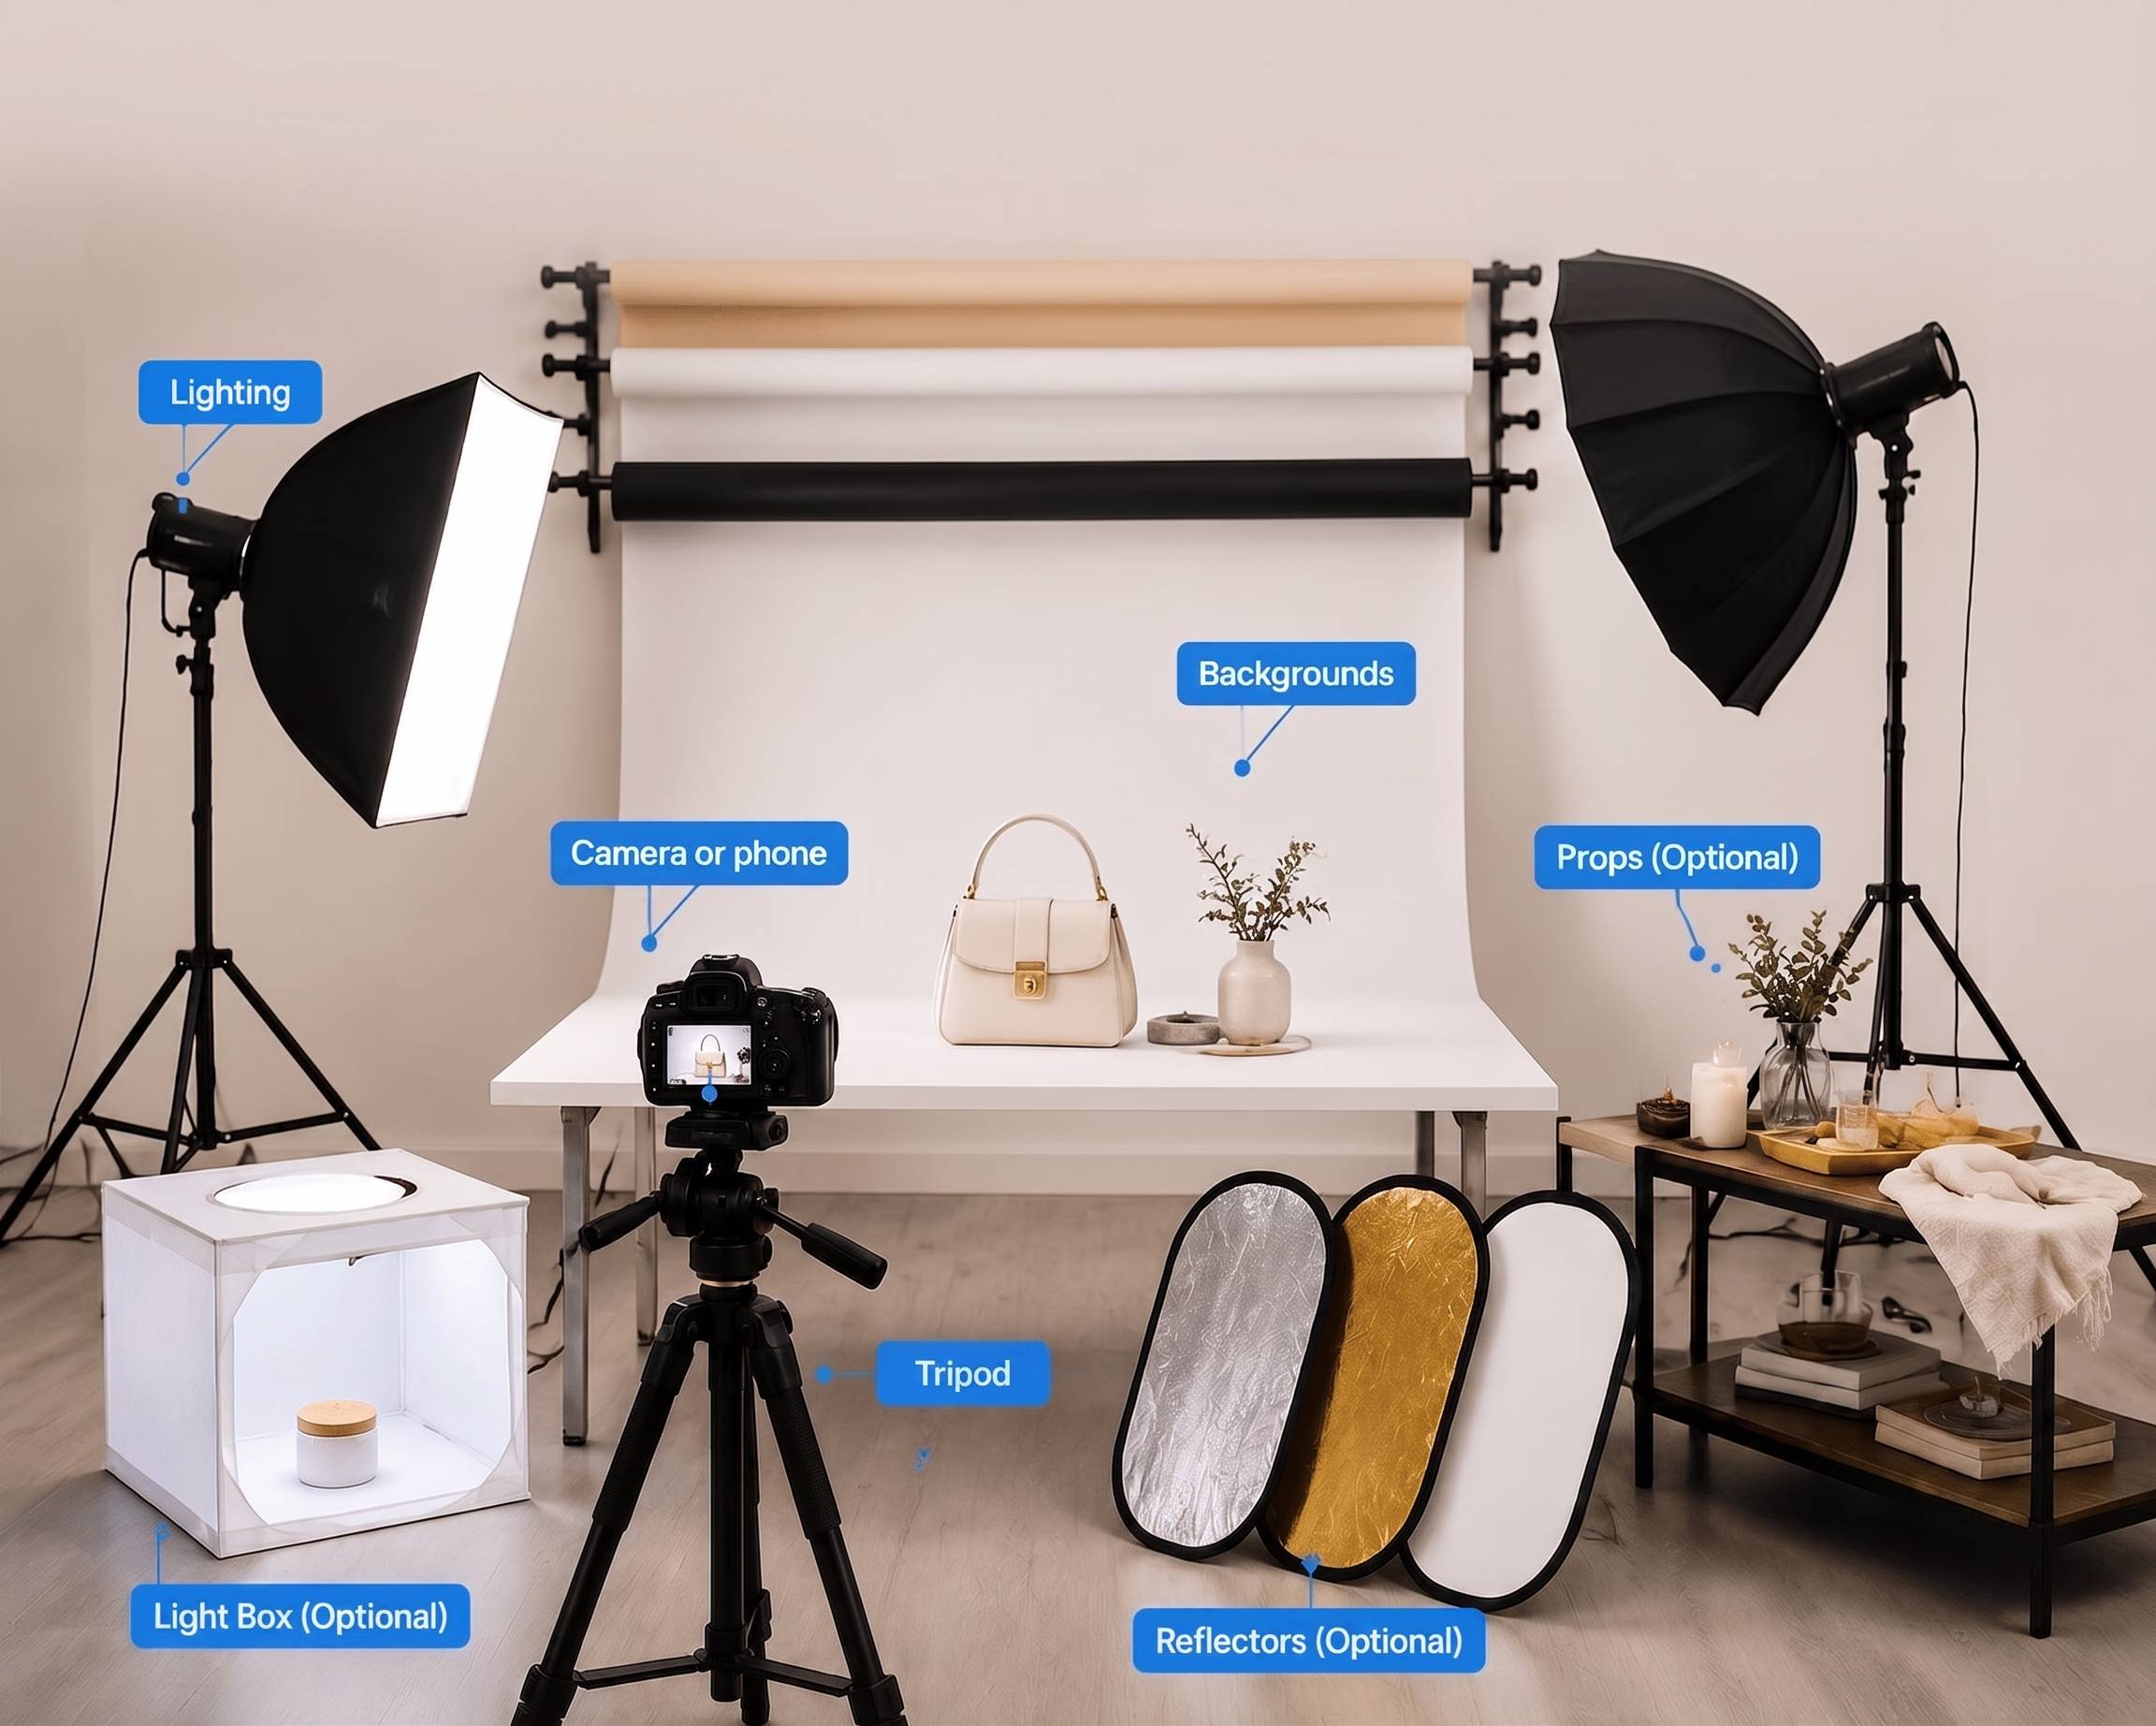
- Camera or Phone: Both cameras and smartphones can capture high-quality product photos. DSLR and mirrorless cameras offer better control, while modern smartphones work well for ecommerce photography with proper lighting.
- Lighting: Lighting is key to great product photography. Soft, even light highlights details and reduces harsh shadows. Natural light is beginner-friendly, while studio lights offer more consistency and control.
- Backgrounds: A clean background keeps the focus on the product. White backgrounds are especially popular for creating a professional ecommerce look.
- Tripod: A tripod stabilizes your camera or phone, preventing blurry shots and keeping framing consistent across multiple photos.
- Light Box (Optional): Ideal for small items like jewelry or cosmetics, a light box creates soft, even lighting and reduces shadows and reflections.
- Reflectors (Optional): Reflectors bounce light onto the product to soften shadows and brighten dark areas. Foam boards are a simple DIY option.
- Props (Optional): Props add context and style to product photos, especially lifestyle shots. Use simple props that enhance the product without distracting from it.
✨ How to Shoot Product Photography Step by Step
Now that you've prepared your equipment and setup, it's time for the most essential part: shooting your product photos. This beginner-friendly step-by-step guide works for both cameras and smartphones. Follow these steps to capture high-quality, professional-looking product images.
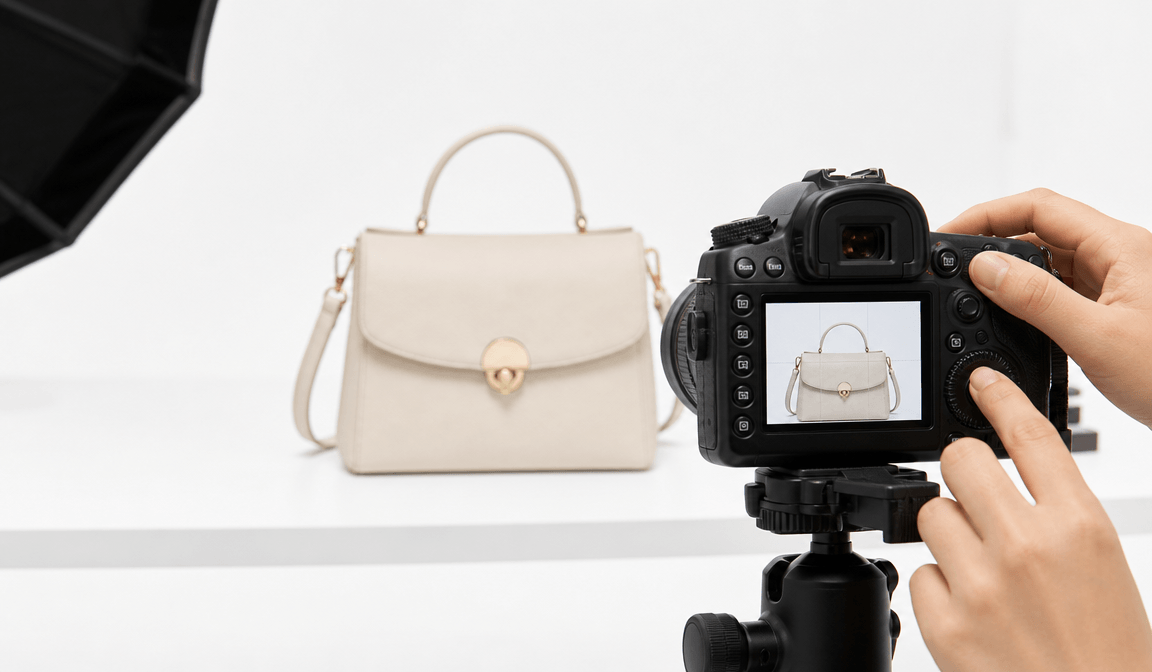
✅️Step 1: Set Up a DIY Product Photography Studio
Building your own product photography studio is the first step. A good setup includes proper lighting and a clean background. The size of your studio depends on your product:
- Small products: A clean table or a plain white wall is usually sufficient.
- Larger products: You'll need more space to accommodate lighting, background, and camera positioning.
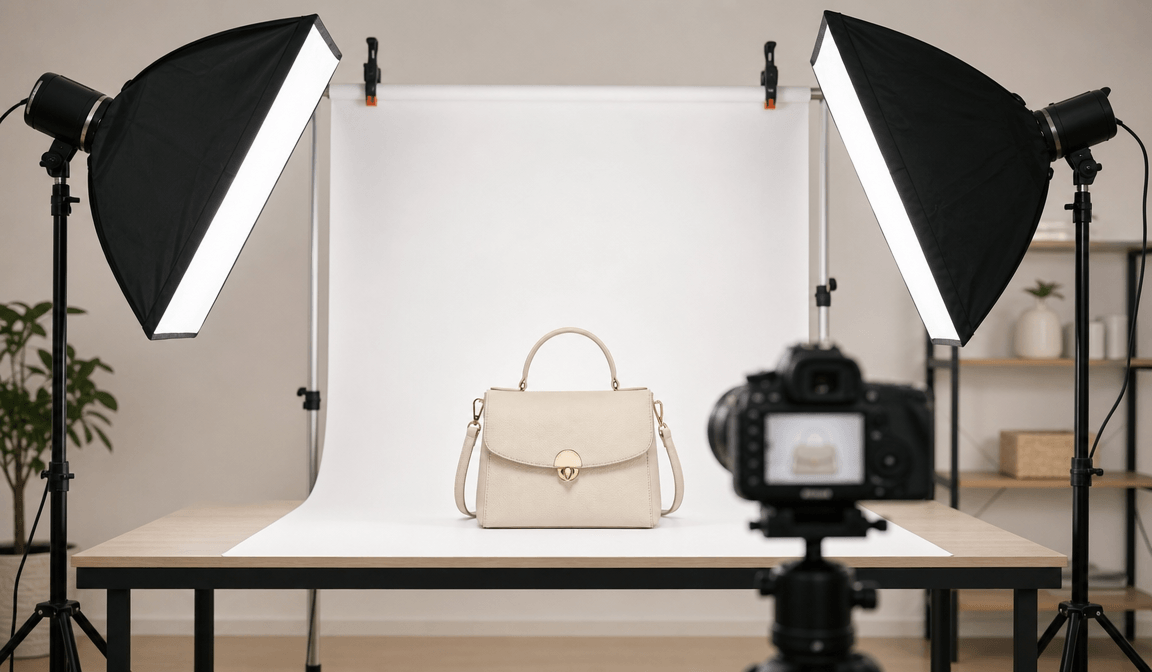
Other tips for your DIY studio:
- Position your lights to avoid harsh shadows.
- Ensure the background is wrinkle-free and neutral.
- Consider using a lightbox for small items like jewelry or cosmetics.
✅️Step 2: Prepare Your Product
Before you start shooting, make sure your product is clean, complete, and properly positioned.
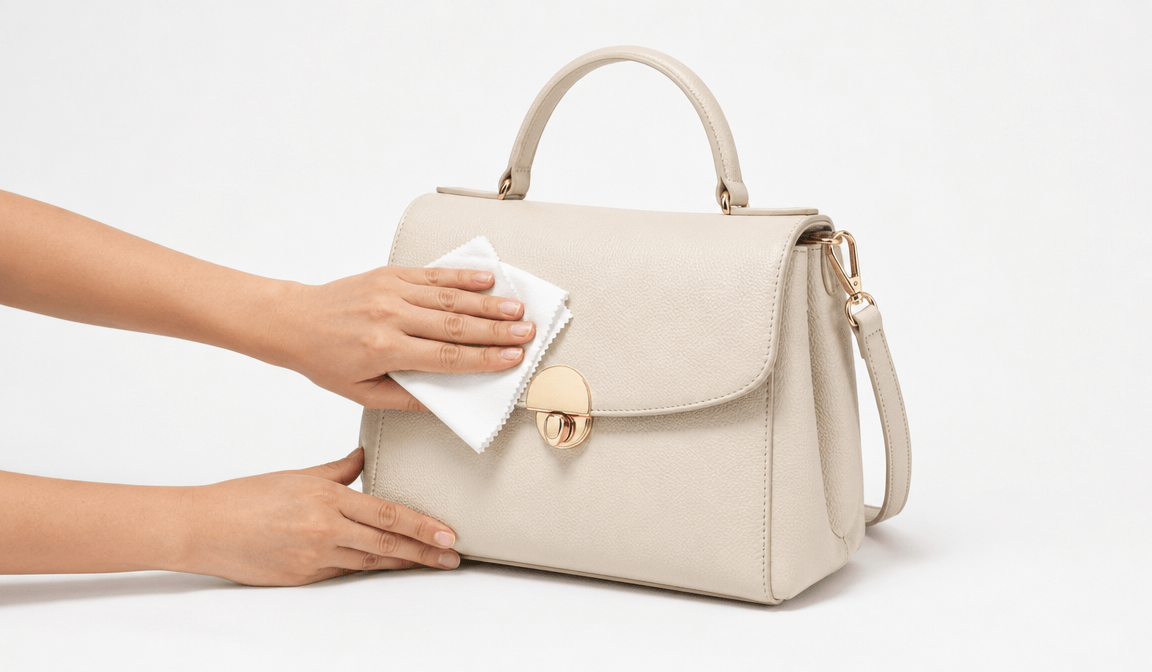
- Clean: Remove dust, fingerprints, or smudges.
- Complete: Include all components if the product comes in parts.
- Properly positioned: Place the product in the center of your background, facing the intended angle.
Small adjustments can make a huge difference in the final image.
✅️Step 3: Adjust Camera or Smartphone Settings
Proper camera settings ensure sharp, high-quality photos. Even smartphones allow manual adjustments to improve results.
Recommended settings:
- Aperture: Use a higher f-stop (f/8 to f/11) to keep the entire product in focus.
- ISO: Keep it low to reduce noise.
- White Balance: Adjust to ensure colors are accurate.
- RAW Format: Shoot in RAW if possible for greater flexibility during editing.
Additionally, enable grid lines to align the product and maintain consistent compositions across multiple shots.
✅️Step 4: Take Product Photos from Multiple Angles
To give customers a complete view of your product, capture it from multiple angles. Different products may require different shots, but the following are commonly used in e-commerce photography:
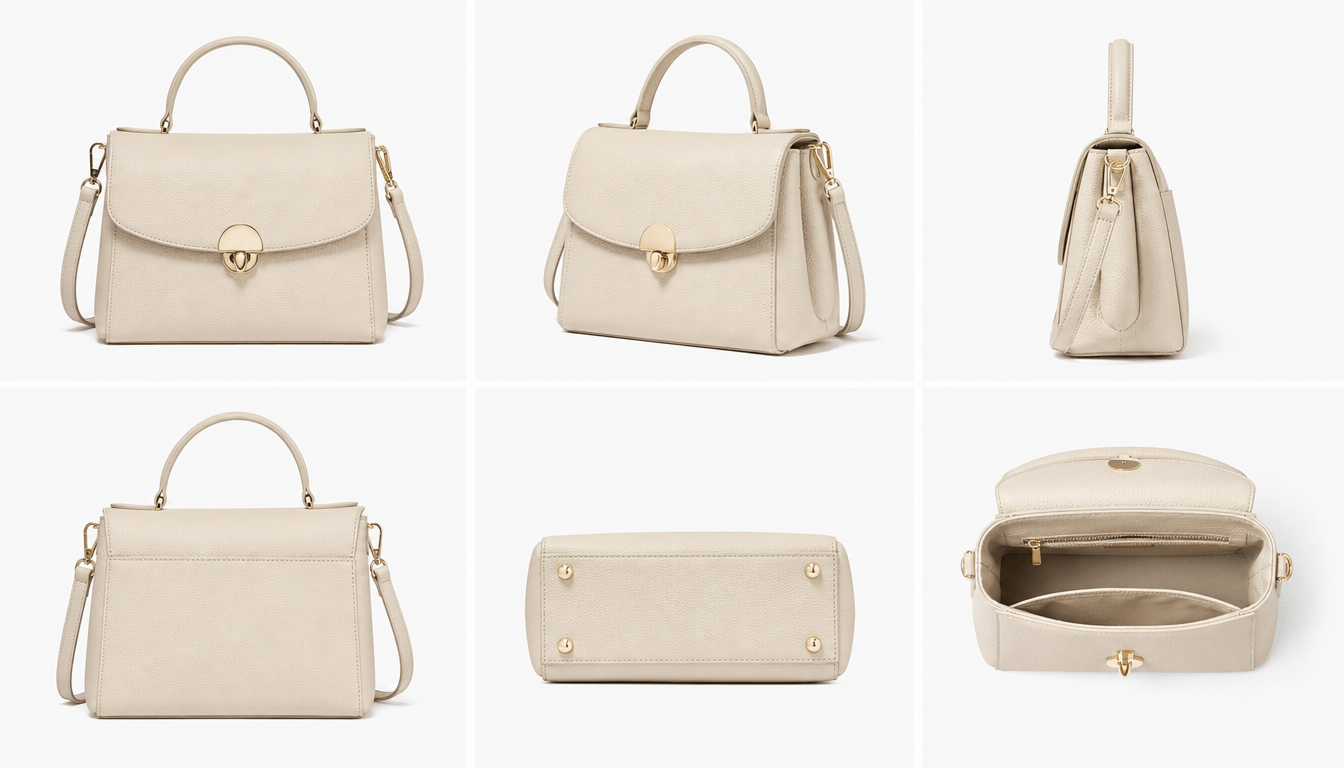
Front View (Straight-On / Eye-Level Shot): Shows the product clearly from the front.
- Flat Lay (Overhead): Captures the product from above, ideal for small items or sets.
- 3/4 Angled Shot: Provides depth and perspective.
- Macro / Close-Up View: Highlights textures, materials, and details.
- Hero Shot (Low Angle): Makes the product appear more prominent and appealing.
- Profile / Side View: Shows the shape, profile, or thickness of the product.
- Scale / Lifestyle Shot: Places the product in context or alongside other items to show size and usage.

Shooting from multiple angles not only helps your customers better understand the product but also increases their confidence in purchasing. Once you've taken your product photos, the next step is editing to ensure they look their best for your e-commerce store.
💡Product Photoshoot Tips for Beginners
During the whole shooting and editing process, there are some beginner-friendly tips to help you elevate the final product photos.
- Keep Lighting Consistent: Maintaining consistent lighting ensures all your product photos look professional and cohesive. Avoid harsh shadows by using soft light sources, such as natural light near a window or a softbox.
- Avoid Cluttered Backgrounds: A clean, distraction-free background keeps the focus on your product. White or neutral backgrounds work best for e-commerce listings.
- Use Shadows Naturally: Soft shadows can add depth and realism to your product images. Avoid overexposed or completely flat lighting, which can make the product look unnatural.
- Maintain Brand Consistency: Your product photos should reflect your brand style across all channels. Use consistent color tones, background styles, and lighting for all products.
- Optimize Images for Fast Loading: High-resolution images are essential, but large files can slow down your website. Compress images without losing quality using AI tools or ecommerce platform features. Make sure images display well on both desktop and mobile devices.
🚀How to Edit Product Photography with AI
After taking your product photos, editing is the next crucial step. Even the best shots often need a little polishing to look professional and ready for your e-commerce store. AI tools make post-production faster and easier, helping beginners achieve high-end product photos without extensive Photoshop skills or hiring a pro editor.
By using AI vibe marketing tools, you can edit product images, create lifestyle scenes, maintain consistency across your catalog, and optimize images for e-commerce platforms.
⭐️Remove and Change Backgrounds
If your DIY background isn't perfect, an AI background remover can help. It automatically removes the original background and lets you replace it with a clean white backdrop, a studio-style background, or any custom scene.
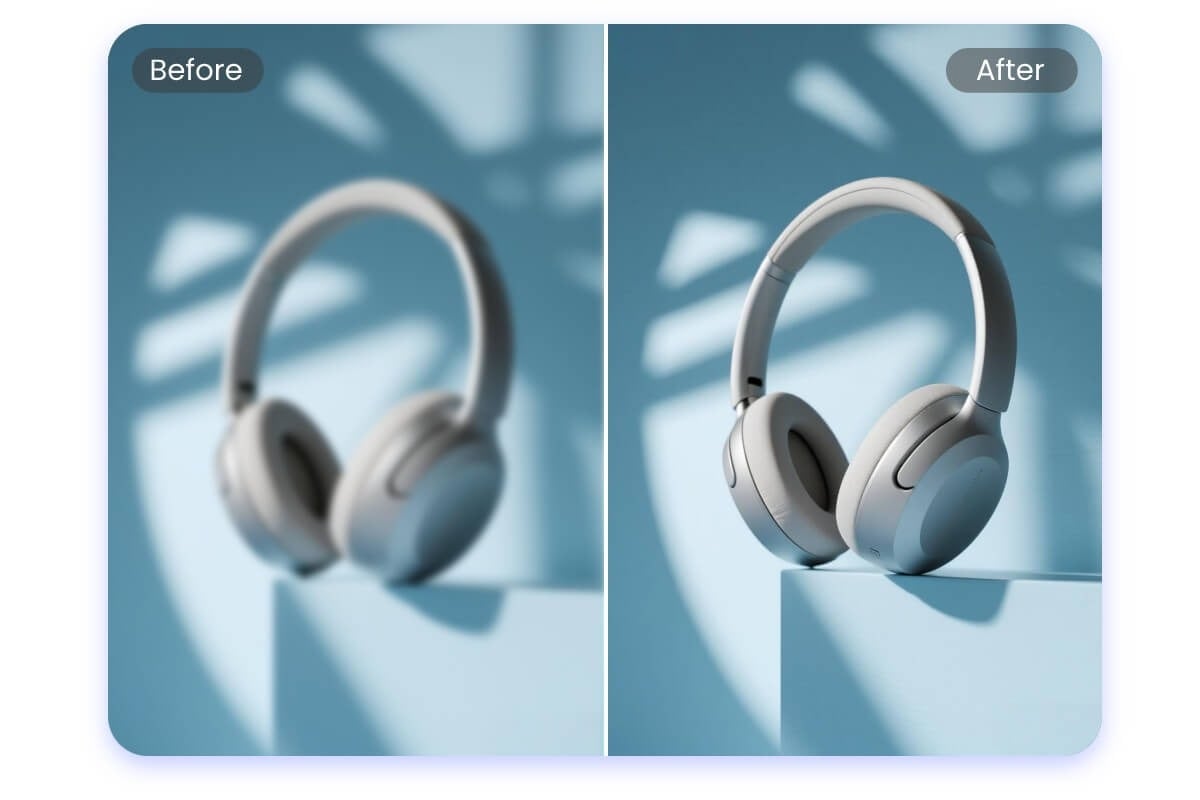
⭐️Enhance Product Image Quality
If your product photos from a smartphone or camera aren't clear or vibrant enough, an AI image enhancer can automatically improve brightness, sharpness, and color accuracy.
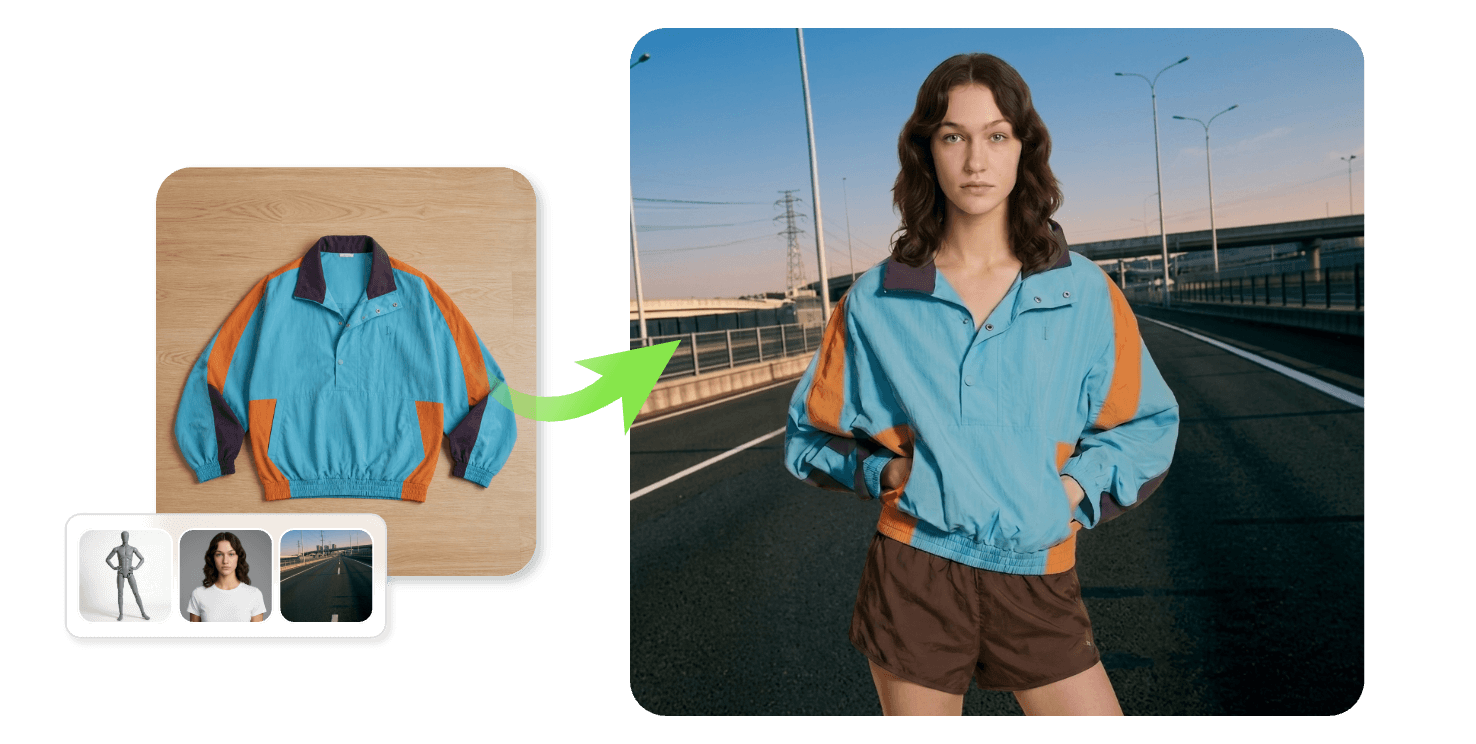
⭐️Create AI Model Visuals
No need to hire models for lifestyle shots. The AI model generator lets you place virtual models in your product photos. You can choose different genders, ages, and regions to match your target audience.
⭐️Resize for E-commerce Platforms in Batch
Different e-commerce platforms have different image requirements. The batch resizer lets you resize product images in bulk to meet platform standards.

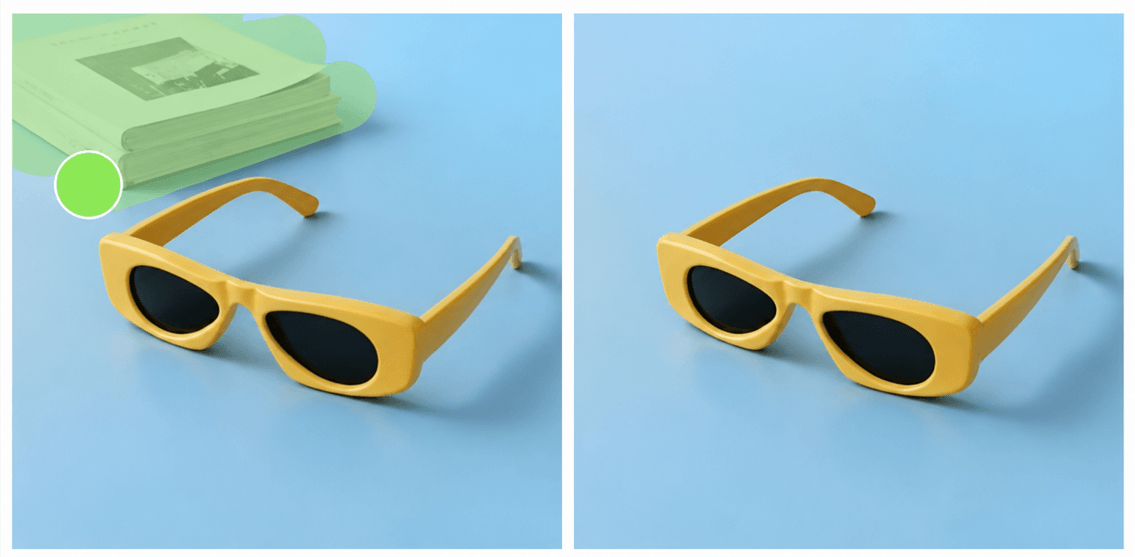
⭐️Remove Unwanted Objects from Product Photo
Sometimes, small distractions in a photo, like dust, packaging labels, or background items, can reduce professionalism. The magic eraser lets you remove unwanted objects from product image with precision.
❓️FAQs About E-commerce Product Photography
- Can I shoot product photos with my phone?
Yes, you can take product photos with your phone. Most smartphones have excellent cameras that can capture product images that seem professional.
- What background is best for product photography?
Actually, your product determines the background. Different backgrounds work well for different items. Custom AI-generated backgrounds for branding, white or neutral for e-commerce listings, or lifestyle for social media.
- Can I create product photos with AI?
Yes, many AI photo editors such as Fotor, Canva, and Picsart allow you to create or enhance product photos. You can remove backgrounds, generate studio-like setups, or even place products in lifestyle scenes.
- What size should ecommerce product images be?
Different platforms have different requirements, but recommended best practices:
Minimum 1000 x 1000 pixels for zoom functionality. Keep aspect ratio consistent across products (e.g., square 1:1). Use AI tools or ecommerce platform features to resize images for multiple devices without losing quality.
- What is the 80/20 rule in photography?
The 80/20 rule suggests that 80% of your image quality comes from preparation (lighting, background, composition), while only 20% comes from post-processing. In other words, focus on getting the shot right first, then use AI or editing for finishing touches.
- How to shoot product photography?
Begin with a table, clean background, and natural light. Use a smartphone or camera, experiment, and enhance with AI tools.
- What is the 20-60-20 rule in photography?
The 20-60-20 rule is a composition guideline: 20% surroundings, 60% main subject, 20% complementary elements, creating balanced and appealing images.